

How to Pick Up and Knit Stitches Along a Slipped Stitch Edge
If you have ever finished a piece of knitting and needed to add a button band, a border, or continue knitting in a completely different direction, pick up and knit is the technique that makes that possible. It lets you attach new stitches directly to an existing edge without sewing anything together.
When that edge has a slipped stitch, the process becomes even more straightforward. The slipped stitches create a row of neat V shapes with a small hole at the base of each one, and those holes are exactly where your needle goes. There is no guessing and no uneven spacing as long as you go into every slipped stitch consistently.
This tutorial walks you through how to pick up and knit stitches along a slipped stitch edge, including how to continue with a slipped stitch on the new section you are creating. There is a full video below so you can follow along.
Why a Slipped Stitch Edge Makes This Easier
Not all knitted edges are the same to work into. A raw garter or stockinette edge can be bumpy and inconsistent, which makes it hard to pick up stitches evenly. A slipped stitch edge solves that problem before it starts.
When you slip the first stitch of every row, it creates a clean ladder of V shapes running down the side of your work. Each V sits over a small hole, and those holes serve as your guide points. One hole per slipped stitch, one stitch picked up per hole. The spacing takes care of itself.
This technique is used for button bands on cardigans, shawl borders, decorative edging, modular knitting panels, and any situation where you need to start a new section of knitting attached to a finished edge.
What You Will Need
- Your knitted piece with a slipped stitch edge
- A needle in the size appropriate for your yarn
- Working yarn in the same or a contrasting color
How to Pick Up and Knit Stitches Along a Slipped Stitch Edge
Step 1: Position Your Work
Hold your knitting with the right side facing you. For garter stitch you can work from either side since both look the same. For stockinette, make sure the smooth V side is facing you rather than the bumpy purl side.
Step 2: Find the Slipped Stitches
Look along the edge of your work. You will see a column of V shapes running vertically down the side. Each V has a small hole sitting at its base. Those holes are where you will insert your needle.
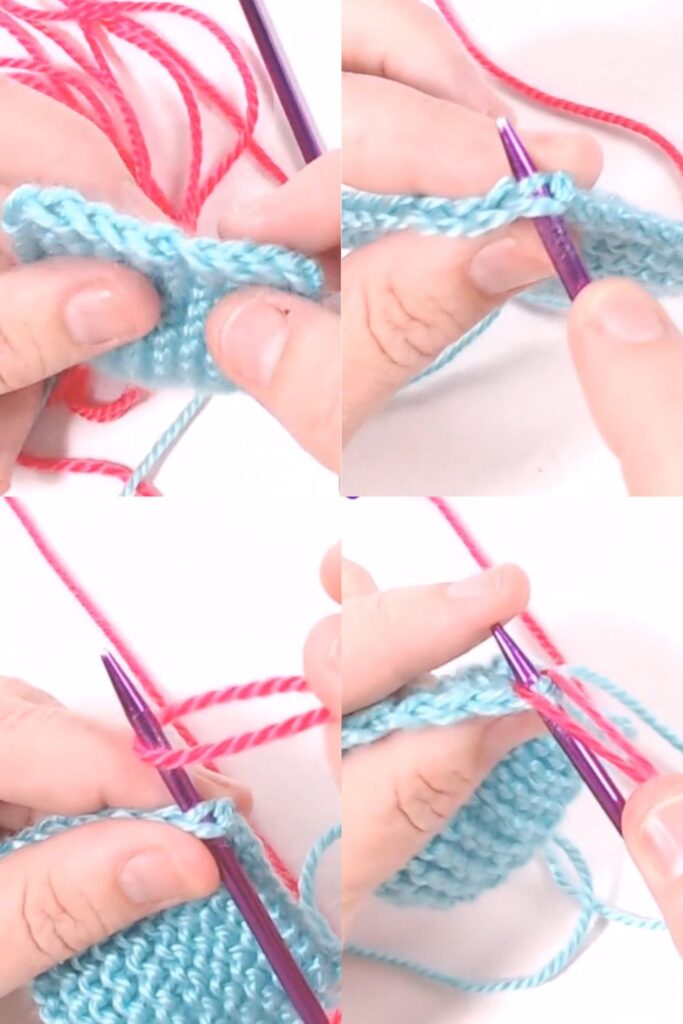
Step 3: Insert the Needle and Pick Up the First Stitch
Go into the hole at the base of the first slipped stitch from front to back. As you insert the needle, make sure both legs of the V sit on top of the needle. You want both strands of yarn captured, not just one.
Wrap your working yarn around the needle just as you would for a knit stitch. Then slowly bring the needle tip back through the hole, pulling a new loop of yarn through with it. Hold the yarn tail in your left hand to keep it out of the way while you work.
That is your first picked up stitch.
Step 4: Continue Along the Edge
Move to the next slipped stitch hole and repeat. Go in from the front, make sure both legs of the V are on the needle, wrap the yarn, and pull through.
Work your way along the entire edge picking up one stitch for every slipped stitch hole. The stitches should line up evenly as you go. If you notice a gap forming, you may have skipped a hole. It is much easier to back up and fix that now than after you have picked up the full edge.
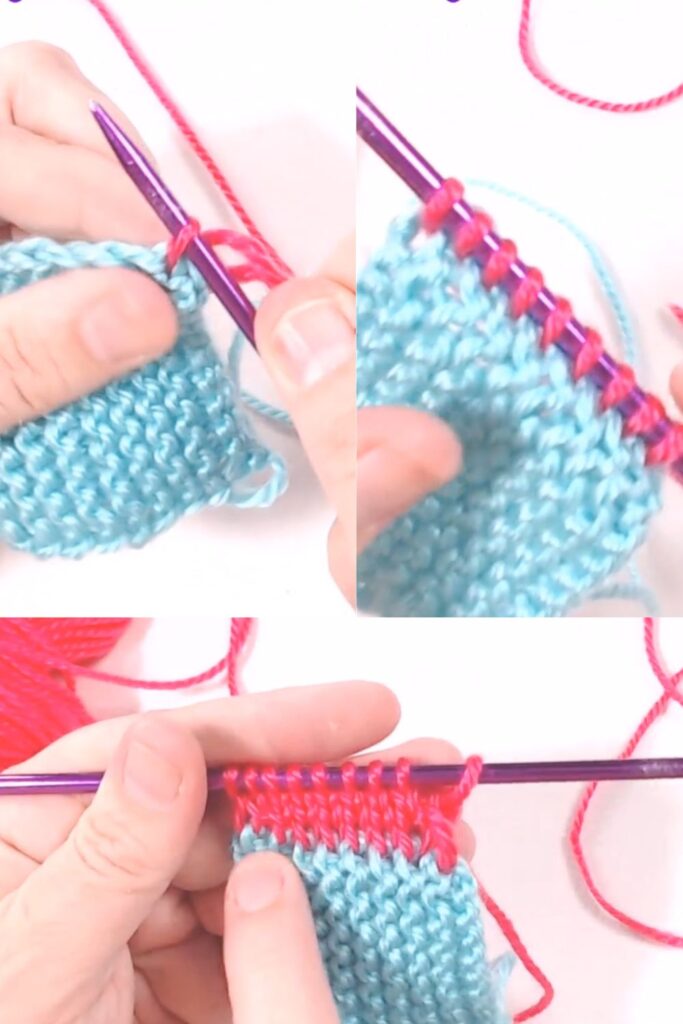
Step 5: Begin Knitting Your New Section
Once all your stitches are picked up, your needle is loaded and ready to knit. Turn your work and begin your new section in whatever stitch pattern your project calls for. Garter, stockinette, ribbing, anything works from here.
How to Continue with a Slipped Stitch Edge on the New Section
If you want to keep a clean neat edge on the new section you are creating, you can continue slipping the first stitch of every row just as you did on the original piece.
The way you slip that first stitch depends on which type of row you are working.
On a knit row, slip the first stitch knitwise with your yarn in the back, then continue knitting across.
On a purl row, slip the first stitch purlwise with your yarn in front, then continue purling across.
This small habit keeps both edges of your new section looking just as tidy as the edge you picked up from.
Tips for Picking Up Stitches Neatly
Use a contrasting yarn color to practice. It is much easier to see exactly where each stitch goes when the new yarn is a different color from the base piece. Once you are comfortable with the technique you can switch back to matching yarn.
Capture both legs of the V. If only one leg of the slipped stitch sits on your needle the connection will be loose and the edge will look uneven. Take a moment to check before wrapping the yarn.
Go slowly on the first few stitches. The motion becomes automatic quickly but the first few stitches are where most errors happen. Once you have a rhythm it is much easier to maintain consistency.
Do not skip holes. Every slipped stitch hole gets a stitch. If you miss one you will have a gap in the picked up row that stands out once you start knitting. Check your spacing every few stitches while you are still close to the start.
Keep your tension relaxed. Picking up stitches too tightly makes the first row of knitting hard to work into. Aim for the same tension you would use when knitting normally.
Frequently Asked Questions
What is the difference between pick up and pick up and knit? Picking up stitches means placing loops on the needle without knitting them. Picking up and knitting means you are simultaneously creating new stitches by drawing a loop of working yarn through the edge. Pick up and knit is what most patterns mean when they say to pick up stitches along an edge.
What if I do not have a slipped stitch edge? You can still pick up stitches along a regular edge but the process is less straightforward. You will need to work into the bumps or bars of the edge stitches and keep a close eye on spacing to stay even. A slipped stitch edge eliminates most of that guesswork.
How many stitches should I pick up? For a slipped stitch edge, pick up one stitch for every slipped stitch hole and you will naturally end up with the right number. For edges without slipped stitches, patterns usually specify how many stitches to pick up or give a ratio such as three stitches for every four rows.
Can I pick up stitches along a cast on or cast off edge? Yes. That technique uses a different set of landmarks, the garter bumps along the cast on or cast off row rather than the slipped stitch holes. The Edges and Finishing hub has more on working with different edge types.
Final Thoughts
Picking up and knitting along a slipped stitch edge is one of those techniques that feels fiddly the first time and completely natural after that. The holes guide you, the V shapes tell you where to insert the needle, and once you have a stitch in every hole the new section of knitting just takes off from there. It is one of the cleanest ways to expand or add to an existing piece.
Next Steps
- Learn how to create the edge you are picking up from: How to Do a Slipped Stitch Edge
- Explore more finishing techniques in the Edges and Finishing hub
")
")
")
")